How to Manage Header – Site Identity (Title, Logo, Tagline, and Site Icon)
In this section, you can customize, and upload the website’s logo, title, and icon. You can freely customize the header in this theme option’s settings. You will also be able to upload your company logo.
Navigate Customize section and go to Site Identity to integrate Site Identity’s multiple identity options such as:
-
- Logo: Upload the site’s logo. The recommended image dimensions are 250 by 250 pixels.
- Site Title: Set the title of the site in this section, for it to appear in the top left corner.
- Tagline: Set the tagline for the site.
- Display Site Title and Tagline: This option allows the users to enable and disable the display of the title and the tagline from the site.
- Site Icon: Upload the Site Icon for the browser icon and app icon for your site. The icon must be square and at least 512px wide and tall.

Colors
In this section, you can customize and change the colors of your site.
You can change the color of the website from Customize section color to modify the color of the site: on the color setting section, there will be the following options such as:
-
- Primary Color: You can customize the site’s primary color from this setting.
- Header Text Color: This section customizes the Header Text-color of the site.
- Background Color: This section allows customizing the background color of the site.

Header Image
From this section, you can add or remove the header image of post page/ blog pages. Click “Add new image” to upload an image file from your computer. The theme works best with an image with a header size of 1000 × 250 pixels — you’ll be able to crop your image once you upload it for a perfect fit.
1. From the Customize section, go to Header Image
2. From the Header Image, the user will have these options:
-
- Header Image: This option allows you to add/modify a header image, then set a new header image.

Background Image
In this section, you can add/modify the background image for your site. You can change and set the image position as desired.
- From the Customize section, go to Background Image.
- From Background Image, you can change the background image for the entire site and can adjust the background image size.

Menus
In this section, you can create new menus- and set the menu location. There are two ways of creating a menu:
- To create a menu, users need to go to the Admin Panel > Appearance > Menu.
OR
- You need to create a menu from > Customize > Menus > Create Menu.
You can similarly create as many menus as needed. After creating the menu, you need to add pages, posts, categories, custom links to that menu. To add such first you need to create some pages, posts, categories, or custom links for the menu.
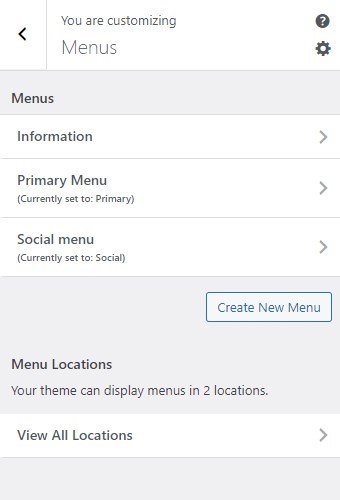
After creating the new menus, you can set the different menu locations, from > Customize > Menus > Menu Locations. The menu will be displayed in the selected location.
Note: Impressive Blog Pro theme has two menu locations provided: Primary menu, and Social menu.
In this theme, you can set the Menu in two different menu locations:
-
- Primary Menu
- Social Menu
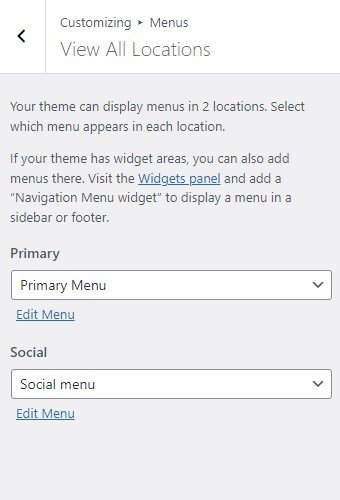
*You can also set the menu location through the dashboard.
Widgets
From this section, you can set up and edit the sidebars and widgets for your site. You can set the widgets using the following ways:
- To configure the Widget, users need to go to Admin Panel > Appearance > Widgets.
- From Widgets, the users will be able to Add and Remove widgets and sidebar.
OR
- From the Customize section, go to Widgets.
*Note: If the user wants to add a widget area in the footer then the user must add widgets in Footer Widget 1, Footer Widget 2, Footer Widget 3, and Footer Widget 4
-
- Sidebar: This sidebar is the default sidebar area. This sidebar area is displayed on blog pages, single blog pages, and pages. You can add/ modify/edit/ remove any section from this section. In this widget, you can add the Ascendoor widgets.
- Widgets: This section will add/modify widgets to the footer section on the whole site.
-
- Off canvas Widgets Area: You can add widgets in this widget to display them in the off canvas widget area.
-

*You can add and edit widgets and sidebars from the dashboard as well.

*Note: Click on Publish to save the changes.